Block materials are widely used in the construction of steam rooms due to their fire safety and strength. A cinder block bath can last up to 50 years.
Features and characteristics of the material
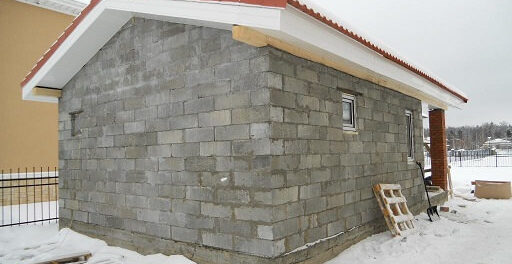
The cinder block is a mixture of blast furnace slag and concrete mass. The material is produced in large blocks with a quadrangular shape and significant mass. Most often, slag is a waste of iron foundry. The blocks are used both for the construction of residential buildings and for the arrangement of economic structures.
Blocks differ in strength and structure. Each type of product has its own preferred application.
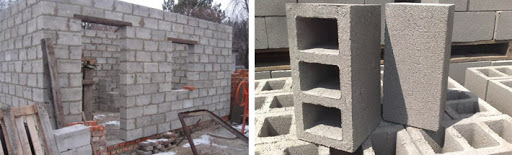
Blocks are full and hollow. Monolithic products are used for the construction of foundations, support structures, plinths. As the main wall material in residential buildings, they are usually not used due to their high thermal conductivity. But they are well suited for the construction of garages.
Hollow blocks have cavities in the middle. They are less durable than solid ones, but they retain heat well. Therefore, they are suitable for laying a bathhouse or a residential building. Such blocks can have different percentages of voids. The larger it is, the lower the strength of the product and the better its thermal insulation qualities. Blocks with a voidness of 35-40% are not used for the construction of load-bearing walls. They are used for warming rooms and arranging partitions between rooms.
There are also decorative blocks used for exterior cladding of buildings. They can have a chipped or painted surface, as well as imitate natural stone.
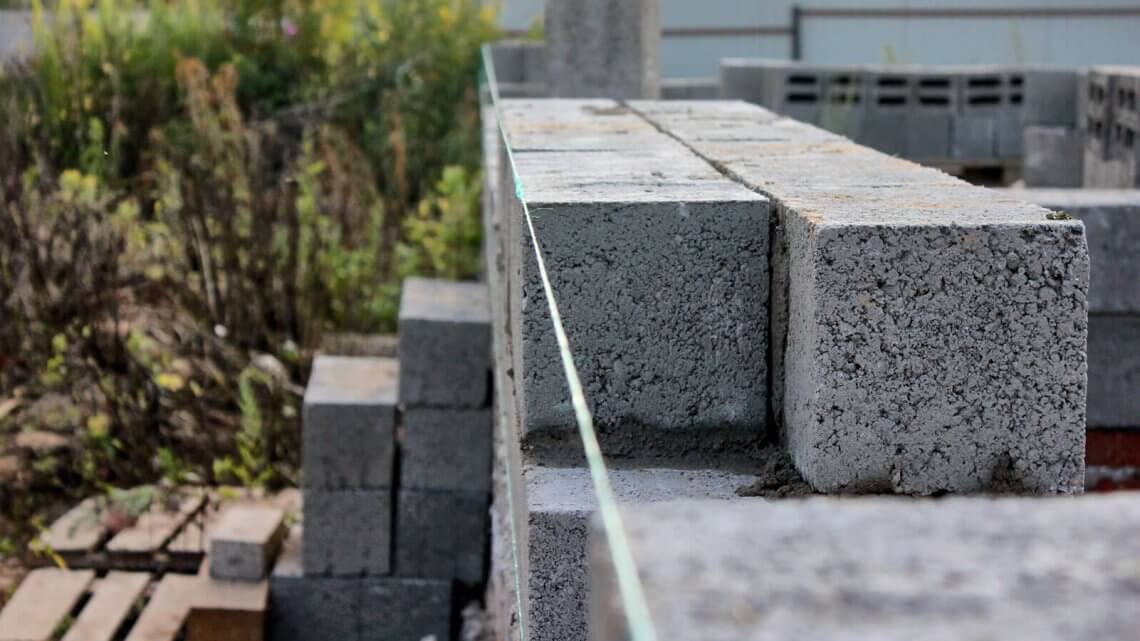
Strength marking consists of the letter M and a number from 35 to 150. The larger it is, the higher the indicator. The fewer cavities in the block, the stronger it is. For the construction of bath walls, products with a voidness of 28-30% are suitable.
Pros and cons of a cinder block bath
The advantages of hollow blocks for the construction of a bath are their ability to retain heat indoors, fire resistance, and low price. Compared to bricks, less cement is consumed when using a cinder block.
The downside of the material is that the slag used for production may contain radioactive compounds. Conscientious manufacturers keep raw materials for a year so that harmful substances disappear. When purchasing a material, you need to make sure that it meets environmental standards.
The sand block bath will be colder, but this raw material is guaranteed not to contain radioactive substances.
Project options
Having decided to build a steam room, you need to prepare its plan and draw a drawing. You can think over the scheme yourself or borrow ready-made ideas. It is better if the project of a cinder block bath will include large side and front overhangs of the roof. Then less water gets on the walls and the building will last longer. It is also desirable that the length of the wall between the outer corners does not exceed the height of the box. This will provide the masonry with the necessary rigidity, the structure will withstand not only a single-pitched, but also a heavy gable roof.
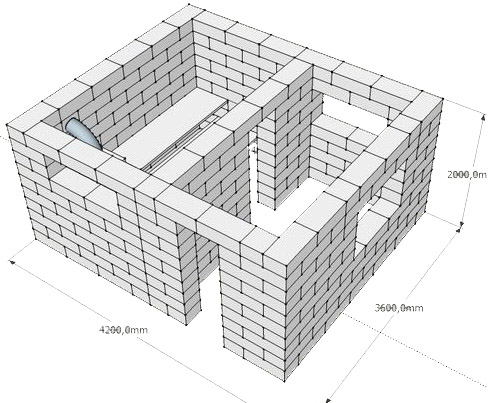
If the owner of a house or summer house has a limited area on the site, he can build a miniature bath with dimensions of 3x3 m, designed for 1-2 people.The dimensions of the pair room are 3x2 m, the dressing room is 3x1 m.
The standard box has dimensions of 4x6 m.In this case, the steam room and the washing room will have dimensions of 2x3 m, and the spacious rest room, where visitors also change clothes, will be 3x3 m.
The project of a bathhouse for three sections with a terrace provides for an open area and large overhangs that protect the facade of the building from precipitation. The internal space includes a steam room, a shower room, a relaxation room and a vestibule.
Phased construction
If you are not confident in your abilities, you can invite an assistant with experience in construction.
Drawing
The mutual arrangement of rooms, their dimensions, the location of communications and drainage paths are demonstrated. Drawing preparation helps to calculate the required number of blocks. To do this, you need to know the dimensions of one unit of material.
Preparation of building materials
It is better to purchase blocks for construction with a small margin (about 5%). You also need to purchase a styling mixture. Insulation and roofing materials are purchased after the walls are erected.
Laying the foundation
The type of foundation depends on the characteristics of the soil: in case of a high occurrence of groundwater, it is better to choose piles with a steel grillage. For swampy regions, a columnar base is suitable, which is laid at a meter depth from the zero mark (ground level). If the soil is not "problematic", equip a strip foundation, which is then waterproofed by laying out roofing material in 3 layers. In any case, the blocks should rise above the soil level by 0.3-0.5 m, since abundant contact with water reduces the service life.
Walling

Blocks are laid out after the concrete tape has dried or the lower strapping is arranged. It is better to prepare a small volume of masonry mortar so that it does not dry out ahead of time.
Step-by-step instructions for building walls:
- The localization of future window and door openings is marked on the foundation.
- First, the blocks are stacked at the corners in pairs of two units at right angles to each other. The squareness is controlled to prevent diagonal failure. Then the first row of blocks is laid on the foundation. Evenness is checked by the level.
- A layer of mortar of 20-25 mm is placed on the blocks (in the future, the seam should be a maximum of 15 mm). Then a new layer of blocks is laid according to the checkerboard principle.
- When the masonry reaches future openings, jumpers are installed from the corner. Cinder blocks are already stacked on them.
For hollow products, do not use large volumes of mortar. It fills cavities, impairing thermal insulation properties.
Roof
The upper harness is fixed to the block by means of corners. Then a rafter frame is created. It is better to cover it with corrugated board.
In the room, it will be necessary to organize drainage and lay sewerage. Sometimes electricity is installed in the bath. The oven is also installed at this stage.
Warming and finishing
Bars with a square section of 5x5 cm are attached to the walls, and mineral wool is placed between them. A waterproofing film is attached on top.
For insulation of the ceiling, in addition to mineral wool, expanded polystyrene is used. The material is placed in the space between the logs on top of the waterproofing and covered with another layer. Then the finishing flooring is created.
On the floor, a layer of expanded clay of 0.25 m is tamped, a reinforcing mesh is laid and a cement mortar is poured by 0.15 cm. After hardening (after 2 weeks), the floor can be tiled.
To decorate a cinder block bath, lining is widely used inside. It must be pretreated with an antiseptic. The inner lining of the room is made using a lathing. Siding is the best choice for outdoor decoration. House block and lining are also used.
In case of independent construction of a bath with an area of 12-15 m², approximately 180 thousand rubles will be spent. This amount includes the cost of the foundation, the cinder blocks themselves, as well as the purchase of the furnace.


